目录
- 一、跨域问题
- 二、跨域解决方案
- 方法一:使用 @CrossOrigin 注解(适用于单个控制器或方法)
- 方法二:全局配置 CORS(推荐)
- 方法 2.1:实现 WebMvpythoncConfigurer
- 方法三:通过 Filter 自定义 CORS 过滤器
- 注意事项
- 三、完整示例演示
- 3.1 创建前端的node.js服务
- 3.2 创建后端的springboot服务
- 后端接口:HelloController.Java
- 跨域配置:CorsConfig.java
- 四、CORS详细解析
- 逐项解释
- allowedOrigins("http://localhost:3000")
- allowedMethods("GET", "POST", "OPTIONS", "DELETE")
- allowCredentials(true)
- allowedHeaders("*")
- maxAge(3600)
- 总结配置最佳实践
一、跨域问题
跨域问题指的是不同站点之间,使用 AJAX 无法相互调用的问题。跨域问题本质是浏览器的一种保护机制,它的初衷是为了保证用户的安全,防止恶意网站窃取数据。但这个保护机制也带来了新的问题,它的问题是给不同站点之间的正常调用,也带来的阻碍,那怎么解决这个问题呢?接下来我们一起来看。
跨域三种情况
在请求时,如果出现了以下情况中的任意一种,那么它就是跨域请求:
- 协议不同,如 http 和 https;
- 域名不同;
- 端口不同。
也就是说,即使域名相同,如果一个使用的是 http,另一个使用的是 https,那么它们也属于跨域访问。常见的跨域问题如下图所示:
| 场景编号 | 当前页面地址(发起方) | 资源地址(目标方) | 是否跨域 | 原因说明 |
|---|---|---|---|---|
| 1 | http://example.com | http://example.com | 否 | 协议、域名、端口都相同 |
| 2 | http://example.com | https://example.com | 是 | 协议不同 |
| 3 | http://example.com | http://example.com:8080 | 是 | 端口不同 |
| 4 | http://example.com | http://sub.example.com | 是 | 子域名不同 |
| 5 | http://example.com | http://example.org | 是 | 主域名不同 |
| 6 | http://example.com | http://example.com/path/page | 否 | 仅路径不同,不构成跨域 |
| 7 | http://127.0.0.1 | http://localhost | 是 | 虽然都是本地,但域名不同 |
| 8 | http://localhost:3000 | http://localhost:4000 | 是 | 端口不同 |
| 9 | http://a.example.com | http://b.example.com | 是 | 子域名不同 |
| 10 | https://example.com | https://example.com | 否 | 协议、域名、端口都相同 |
跨域的核心判断标准是:协议(scheme)、主机(host)、端口(port)三者中有任意一个不同即为跨域。
二、跨域解决方案
在Spring Boot中,可以使用CORS(跨源资源共享,Cross-Origin Resource Sharing)来解决前端请求接口时出现的跨域问题。Spring Boot 提供了多种方式来配置 CORS,以下是几种常见的解决方式:
方法一:使用 @CrossOrigin 注解(适用于单个控制器或方法)
import org.springframework.web.bind.annotation.*;

@RestController
@RequestMapping("/api")
@CrossOrigin(origins = "*") // 允许所有来源跨域访问
public class MyController {

    @GetMapping("/data")
    public String getData() {
        return "Hello, CORS!";
    }
}
你也可以只在特定方法上添加:
@CrossOrigin(origins = "http://localhost:3000")
@GetMapping("/specific")
public String specificEndpoint() {
    return "This is CORS-enabled only for localhost:3000";
}
方法二:全局配置 CORS(推荐)
适合需要对整个项目的接口统一进行跨域配置。
方法 2.1:实现 WebMvcConfigurer
import org.springframework.context.annotation.Configuration;
import org.springframework.web.servlet.config.annotation.CorsRegistry;
import org.springframework.web.servlet.config.annotation.WebMvcConfigurer;

@Configuration
public class CorsGlobalConfig implements WebMvcConfigurer {

    @Override
    public void addCorsMappings(CorsRegistry registry) {
        registry.addMapping("/**") // 匹配所有请求路径
                .allowedOrigins("*") // 允许所有来源
                .allowedMethods("GET", "POST", "PUT", "DELETE", "OPTIONS") // 允许的方法
                .allowedHeaders("*") // 允许的请求头
                .allowCredentials(true) // 是否允许携带cookie
                .maxAge(3600); // 预检请求缓存时间(秒)
    }
}
allowedOrigins("*") 与 allowCredentials(true) 不可同时使用,若需携带 Cookie,需指定具体域名。
方法三:通过 Filter 自定义 CORS 过滤器
适用于更底层的控制(不推荐,除非有特殊需求)。
import javax.servlet.*;
import javax.servlet.http.HttpServletResponse;
import org.springframework.stereotype.Component;
import java.io.IOException;

@Component
public class CorsFilter implements Filter {

    @Override
    public void doFilter(ServletRequest request, ServletResponse response, FilterChain chain)
            throws IOException, ServletException {

        HttpServletResponse res = (HttpServletResponse) response;
        res.setHeader("Access-Contjavascriptrol-Allow-Origin", "*");
        res.setHeader("Access-Control-Allow-Methods", "GET, POST, PUT, DELETE, OPTIONS");
        res.setHeader("Access-Control-Allow-Headers", "*");
        res.setHeader("Access-Control-Allow-Credentials", "true");

        chain.doFilter(request, response);
    }
}
注意事项
- 如果你使用了
spring-security,还需要在安全配置类中额外开启 CORS。 @CrossOrigin默认支持 GET/HEAD/POST,其他请求方法如 PUT/DELETE 需要手动配置。- 在生产环境下,不要使用
"\*"通配符,应明确指定允许的域名。
三、完整示例演示
写一个完整的node.js前端出现要跨域访问的时候,用SpringBoot的CORS()来解决跨域问题完整代码实例。
3.1 创建前端的node.js服务
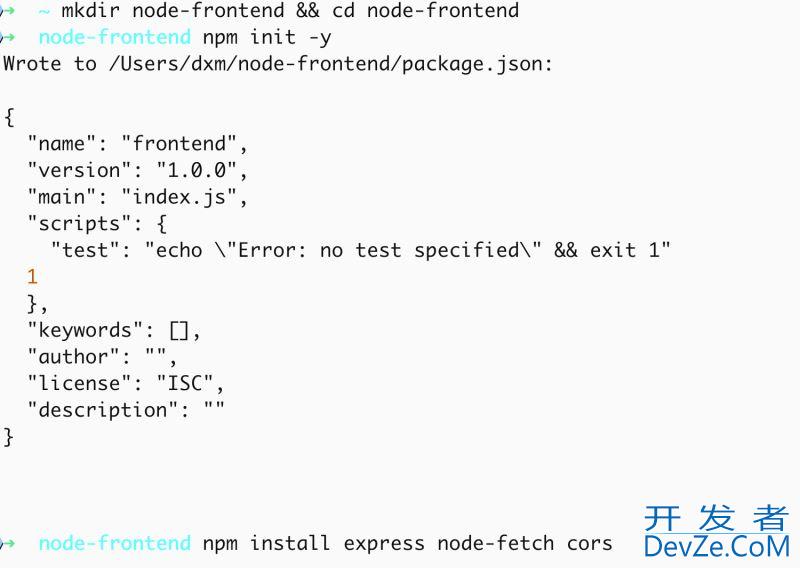
创建目录
mkdir node-frontend && cd node-frontend
初始化
npm init -y
安装依赖
npm install express node-fetch cors
新建一个index.js文件
const express = require('express');
const fetch = require('node-fetch');
const cors = require('cors');

const app = express();
const PORT = 3000;

app.use(cors()); // 允许前端页面跨域访问(如果需要)

// 前端页面
app.get('/', (req, res) => {
  res.send(`
    <html>
      <body>
        <h2>Node.js Frontend</h2>
        <button onclick="callBackend()">Call Spring Boot API</button>
        <p id="result"></p>
        <script>
          function callBackend() {
            fetch('http://localhost:8080/api/hello', {
              method: 'GET',
              credentials: 'include'
            })
            .then(response => response.text())
            .then(data => {
              document.getElementById('result').innerText = data;
            })
            .catch(error => console.error('Error:', error));
          }
        </script>
      </body>
    </html>
  `);
});


app.listen(PORT, () => {
    console.log(`Frontend running at http://localhost:${PORT}`);
});
启动node.js的服务
cd node-frontend
node index.js
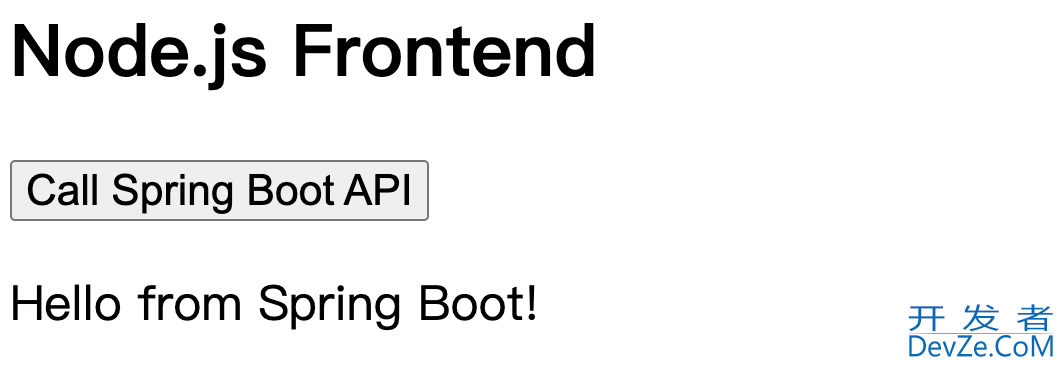
访问http://localhost:3000/,看到如下页面

在没有配置这个的时候,通过F12查看控制台,点击按钮会提示如下信息:

3.2 创建后端的springboot服务
后端接口:HelloController.java
import org.springframework.web.bind.annotation.GetMapping;
import org.springframework.web.bind.annotation.RequestMapping;
import org.springframework.web.bind.annotation.RestController;

@RestController
@RequestMapping("/api")
public class HelloController {

    @GetMapping("/hello")
    public String hello() {
        return "Hello from Spring Boot!";
    }
}
跨域配置:CorsConfig.java
import org.springframework.context.annotation.Configuration;
import org.springframework.web.servlet.config.annotation.CorsRegistry;
import org.springframework.web.servlet.config.annotation.WebMvcConfigurer;

@Configuration
public class CorsConfig implements WebMvcConfigurer {
    @Override
    public void addCorsMappings(CorsRegistry registry) {
        registry.addMapping("/**")
                .allowedOrigins("http://localhost:3000") // 只允许 node 前端
                .allowedMethods("GET", "POST", "OPTIONS", "DELETE")
                .allowCredentials(true);
    }
}
启动springboot和node.js服务BPZybckJNX以后,再去访问http://localhost:3000/,点击下面这个按钮,就会顺利拿到后端返回的数据
四、CORS详细解析
下面是对提到的 Spring Boot 跨域配置中每一项的详细解释:
registry.addMapping("/**")
        .allowedOrigins("http://localhost:3000") // 只允许来自该源的跨域请求
        .allowedMethods("GET", "POST", "OPTIONS", "DELETE") // 允许的 HTTP 方法
        .allowCredentials(true); // 允许携带凭证(如 Cookie)
逐项解释
addMapping("/**")
- 作用:设置哪些 URL 路径可以被跨域请求访问。
"/**"表示对 所有接口 开启跨域支持。- 示例:
/api/hello、/user/info等都受此配置控制。
allowedOrigins("http://localhost:3000")
- 作用:设置允许跨域请求的来源(origin),即前端运行的地址。
- 浏览器发起跨域请求时会带上
Origin请求头,Spring 会检查它是否在这个列表中。 - 示例:
- 当前设置只允许从
http://localhost:3000发起的跨域请求。 - 如果你用的是 React/Vite/Node.js 前端开发服务器,就很可能是这个端口。
- 当前设置只允许从
注意:如果你使用 allowedOrigins("*") 通配所有来源,就不能使用 allowCredentials(true),否则浏览器会拒绝响应。
allowedMethods("GET", "POST", "OPTIONS", "DELETE")
- 作用:指定允许前端发起的 HTTP 方法。
- 常见的跨域请求方法包括:
GET:获取资源POST:提交数据OPTIONS:预检请求(preflight),浏览器用于询问服务器是否允许跨域DELETE:删除资源
- 你也可以加上
"PUT"、"PATCH"等方法,取决于你的 API 接口支持哪些。
allowCredentials(true)
作用:允许前端在跨域请求中携带认证信息(如
Cookie、HTTP 认证头)。如果你希望用户登录后发送带 cookie 的请求(比如
JSESSIONID),必须设置为true。配合前端的配置使用:
fetch("http://localhost:8080/api/hello", {
  credentials: "include"  // 必须设置这项才能带上 Cookie
});
**关键点:**当
allowCredentials(true)时,allowedOrigins("*")是不允许的,必须指定明确的 Origin。
allowedHeaders("*")
- 作用:指定哪些请求头(headers)是允许的跨域请求中使用的。
- 默认情况下,浏览器不允许跨域请求携带自定义请求头。使用
allowedHeaders可以明确告诉 Spring Boot 服务器,允许哪些请求头携带过来。
示例:
.allowedHeaders("*") // 允许所有请求头
这表示只有
Authorization和Content-Type这两个头部字段可以在跨域请求中被使用。
例子:
假设你想在请求中添加一个自定义的 X-Auth-Token 头部字段来验证身份,那么你需要在服务器端配置允许这个头部:
.allowedHeaders("X-Auth-Token")
maxAge(3600)
- 作用:指定浏览器在进行 预检请求(preflight) 时,缓存响应的最大时间(单位:秒)。
- 预检请求是指在实际发起跨域请求之前,浏览器会先发送一个
OPTIONS请求到目标服务器,询问是否允许跨域操作。服务器响应该请求后,浏览器会根据返回的信息决定是否继续发送实际的请求。
示例:
.maxAge(3600) // 允许预检请求的缓存时间为 3600 秒(即 1 小时)
- 实际效果:如果预检请求成功,浏览器会缓存该响应 3600 秒,直到缓存过期才重新发送预检请求。如果你有大量的跨域请求,增加缓存时间能够减少预检请求的频繁发起,提高性能。
例子:
- 如果你经常发送跨域请求,而预检请求(OPTIONS)非常频繁,你可以通过增加
maxAge来减少预检请求的次数,从而提高性能。 maxAge(3600)表示预检请求的响应将在 1 小时内缓存,不会再发送新的预检请求。
综合配置
根据上述的解释,完整的跨域配置代码可能是这样的:
registry.addMapping("/**")
        .allowedOrigins("http://localhost:3000") // 只允许来自该源的跨域请求
        .allowedMethods("GET", "POST", "OPTIONS", "PUT", "DELETE") // 允许的 HTTP 方法
        .allowedHeaders("Content-Type", "Authorization", "X-Auth-Token") // 允许的请求头
        .allowCredentials(true) // 允许携带凭证(如 Cookie)
        .maxAge(3600); // 预检请求缓存 1 小时
总结配置最佳实践
registry.addMapping("/**")
        .allowedOrigins("http://localhost:3000")  // 推荐明确指定前端地址
        .allowedMethods("GET", "POST", "OPTIONS", "PUT", "DELETE")
        .allowedHeaders("*")                      // 可选,允许前端发送的自定义 Header
        .allowCredentials(true)
        .maxAge(3600);                            // 可选,预检请求的缓存时间(单位秒)
以上就是SpringBo编程客栈ot使用CORS解决无法跨域访问问题的具体步骤的详细内容,更多关于SpringBoot CORS跨域访问的资料请关注编程客栈(www.devze.com)其它相关文章!



 加载中,请稍侯......
精彩评论