SpeingBoot 集成Caffeine实现一级缓存使我们经常遇到的场景。今天我们具体分享一下:
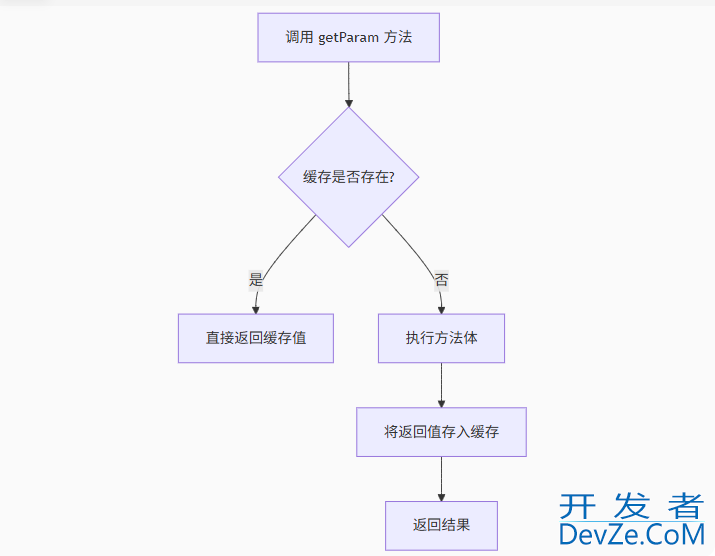
首先 Caffeine 作为一级缓存,它是 Spring 5.x 默认的本地缓存实现,性能优于 Guava Cache,且支持过期时间设置。缓存执行的流程图如下:

1、pom文件引入包
         <dependency>
            <groupId>org.springframework.boot</groupId>
            <artifactId>spring-boot-starter-cache</artifactId>
        </dependency>
        <dependency>
            <groupId>com.github.ben-manes.caffeine</groupId>
            <artifactId>caffeine</artifactId>
            <version>2.9.3</version> <!-- 兼容 Spring Boot 2.3.5 的版本 -->
        </dependency>
2、换成配置类
import com.github.benmanes.caffeine.cache.Caffeine;
import org.springframework.cache.CacheManager;
import org.springframework.cache.annotation.EnableCaching;
import org.springframework.cache.caffeine.CaffeineCacheManager;
import org.springframework.context.annotation.Bean;
import org.springframework.context.annotation.Configuration;
import Java.util.concurrent.TimeUnit;
@Configuration
@EnableCaching
public class CacheConfig {
   /**
    Caffeine 配置参数:
    expireAfterWrite:写入后多久过期
    expireAfterAccess:最后访问后多久过期
    maximumSize:缓存的最大元素数量
    weakKeys/weakValues:使用弱引用,支持垃圾回收
    **/
    @Bean
    public CacheManager cacheManager() {
        CaffeineCacheManager cacheManager = new CaffeineCacheManager();
        cacheManager.setCaffeine(Caffeine.newBuilder()
                .expireAfterWrite(1, TimeUnit.MINUTES)//可以选多种时间
                .maximumSize(10));//最大缓存个数
        // 配置特定缓存(超时时间5分钟,到时间自动置为null)
        cacheManager.setCacheNames(java.util.Arrays.asList("timeoutParam"));
        return cacheManager;
    }
}
1)配置多个缓存
@Bean
    public CacheManager cacheManager() {
        SimpleCacheManager cacheManager = new SimpleCacheManager();
        // 配置不同的缓存区域(可根据业务需求设置不同的超时时间)
        cacheManager.setCaches(Arrays.asList(
                new CaffeineCache("timeoutParams",
                        Caffeine.newBuilder()
                                .expireAfterWrite(5, TimeUnit.MINUTES) // 5分钟过期
                                .maximumSize(100)
                                .build()
 android               ),
                new CaffeineCache("longTermCache",
                        Caffeine.newBuilder()
                                .expireAfterWrite(1, TimeUnit.HOURS) // 1小时过期
                                .maximumSize(1000)
                                .build()
                )
        ));
        return cacheManager;
    }
不同缓存数据的超时时间可能不一样,因此需要设置不同的缓存。
3、业务层实现
import org.springframework.cache.annotation.Cacheable;
import org.springframework.cache.annotation.CachePut;
import org.springframework.stereotype.Service;
@Service
public class MyService {
    // 获取参数(从缓存读取,若无则执行方法并缓存结果)unless:条件表达式,满足条件则不缓存(如 #result == null)
    @Cacheable(value = "timeoutParams", key = "#paramName")
    public String getParam(String paramName) {
        // 模拟从数据库或其他数据源获取
        System.out.println("从数据源加载参数: " + paramName);
        rejavascriptturn loadParamFromDB(paramName);
    }
    // 更新参数(强制刷新缓存,即使缓存存在)
    @CachePandroidut(value = "timeoutParams", key = "#paramName")
    public String updateParam(String paramName, String newValue) {
        // 保存到数据库
        saveParamToDB(paramName, newValue);
        return newValue;
    }
    // 清除缓存:调用此方法后,指定缓存键将被删除
    @CacheEvict(value = "timeoutParams", key = "#paramName")
    public void clearParam(String paramName) {
        System.out.println("清除缓存: " + paramName);
        // 通常无需方法体,仅用于触发缓存清除
    }
    // 模拟数据库操作
    private String loadParamFromDB(String paramName) {
        // 实际项目中从数据库或其他数据源获取
        return "默认值";
    }
    private void saveParamToDB(String paramName, String value) {
        // 实际项目中保存到数据库
    }
}
4、控制层调用
       // 第一次调用,会从数据源加载
        String value1 = myService.getParam("testParam");
        System.out.println("第一次获取: " + value1);
        // 第二次调用,会从缓存获取
        String value2 = myService.getParam("testParam");
        System.out.println("第二次获取: " + value2);
5、通过key获取数据
1)通过key手动插入
@Service
public class ManualCacheService {
    @Autowired
    private CacheManager cacheManager;
    public void initCacheManually(String key, Object value) {
        Cache cache = cacheManager.getCache("paramCache");
        if (cache != null) {
            cache.put(key, value);  // 手动放入缓存
            System.out.println("手动初始化缓存: " + key + " = " + value);
        }
    }
}
2)手动获取
@Service
public class CacheAccessService {
    @Autowired
    private CacheManager cacheManager;
    public Object getValueManually(String key) {
        Cache cache = cacheManager.getCache("paramCache");
        if (cache != null) {
            Cache.ValueWrapper wrapper = cache.get(key);
            return wrapper != null ? wrapper.get() : null;
        }
        return null;
    }
}
6、通过注解获取数据(注意伪代码)
@Service
public class JTServiceImpl {
    @Service
    public void someMethod() {
        // 自调用 - 导致缓存失效
        String token = this.getGlobalToken("token123");
    }
    @Cacheable(value = "timeoutGlobalToken", key = "#globalToken")
    public String getGlobalToken(String globalToken) {
        // 实际获取token的逻辑
    }
}
注意:注解失效原因及解决方案
原因分析:
Spring AOP 工作原理:
Spring 的缓存功能(包括
@Cacheable)是基于 AOP 代理实现的当调用
@Cacheable方法时,实际调用的是代理对象的方法,不是原始对象的方法
自调用问题(Self-Invocation):
当同一个类中的方法 A 直接调用方法 B(带
@Cacheable注解)时调用发生在原始对象内部,绕过了 Spring 代理
导致
@Cacheable注解完全失效
解决方案:将缓存方法移到另一个Service中
// 新建专门处理缓存的服务
@Service
public class TokenCacheService {
    @Cacheable(value = "timeoutGlobalToken", key = "#globalToken")
    public String getGlobalToken(String globalToken) {
        // 实际获取token的逻辑
        return fetchTokenFromSource(globalToken);
    }
    private String fetchTokenFromSource(String globalToken) {
        // 从数据库/API获取token的实现
    }
}
调用方:
// 原服务调用缓存服务
@Service
public class JTServiceImpl {
    @Autowired
    private TokenCacheService tokenCacheService;
    public void businessMethod() {
        // 跨类调用 - 触发缓存
        String token = tokenCacheService.getGlobalToken("token123");
    }
}
这是一个比较常用的解决方案。
8、获取所有缓存信息
@GetMapping("/cache/param")
public Map<Object, Object> getCacheEntries() {
    Cache cache = cacheManager.getCache("paramCache");
    if (cache == null) {
        return Collections.emptyMap();
    }
    com.github.benmanes.caffeine.cache.Cache<Object, Object> nativeCache =
        (com.github.benmanes.caffeine.cache.Cache<Object, Object>) cache.getNativeCache();
    return new HashMap<>(nativeC编程客栈ache.asMap());
}
到此,SpringBoot 集成Caffeine实现一级缓存分享完成,下篇我们会继续分享此种缓存实现的细节,敬请期待!
到此这篇关于SpringBoot 集成Caffeine实现一级缓存编程的文章就介绍到这了,更多相关SpringBoot Caffeine一级缓存内容请搜索编程客栈(www.devze.com)以前的文章或继续浏览下面的相关文章希望大家以后多多支持编程客栈(www.devze.com)!


 加载中,请稍侯......
精彩评论