目录
- 步骤:
- 1)、必须创建一个war项目;(利用idea创建好目录结构)
- 2)、将嵌入式的Tomcat指定为provided;
- 3)配置项目的目录结构
- 4)部署Tomcat
- 5)、必须编写一个SpringBootServletInitializer的子类,并调用configure方法
- 6)、启动服务器就可以使用;
- 原理
嵌入式编程客栈Servlet容器:应用打成可执行的jar
优点:简单、便携;
缺点:默认不支持JSP、优化定制比较复杂.;
外置的Servlet容器:外面安装Tomcat---应用war包的方式打包;
步骤:
1)、必须创建一个war项目;(利用idea创建好目录结构)

2)、将嵌入式的Tomcat指定为provided;
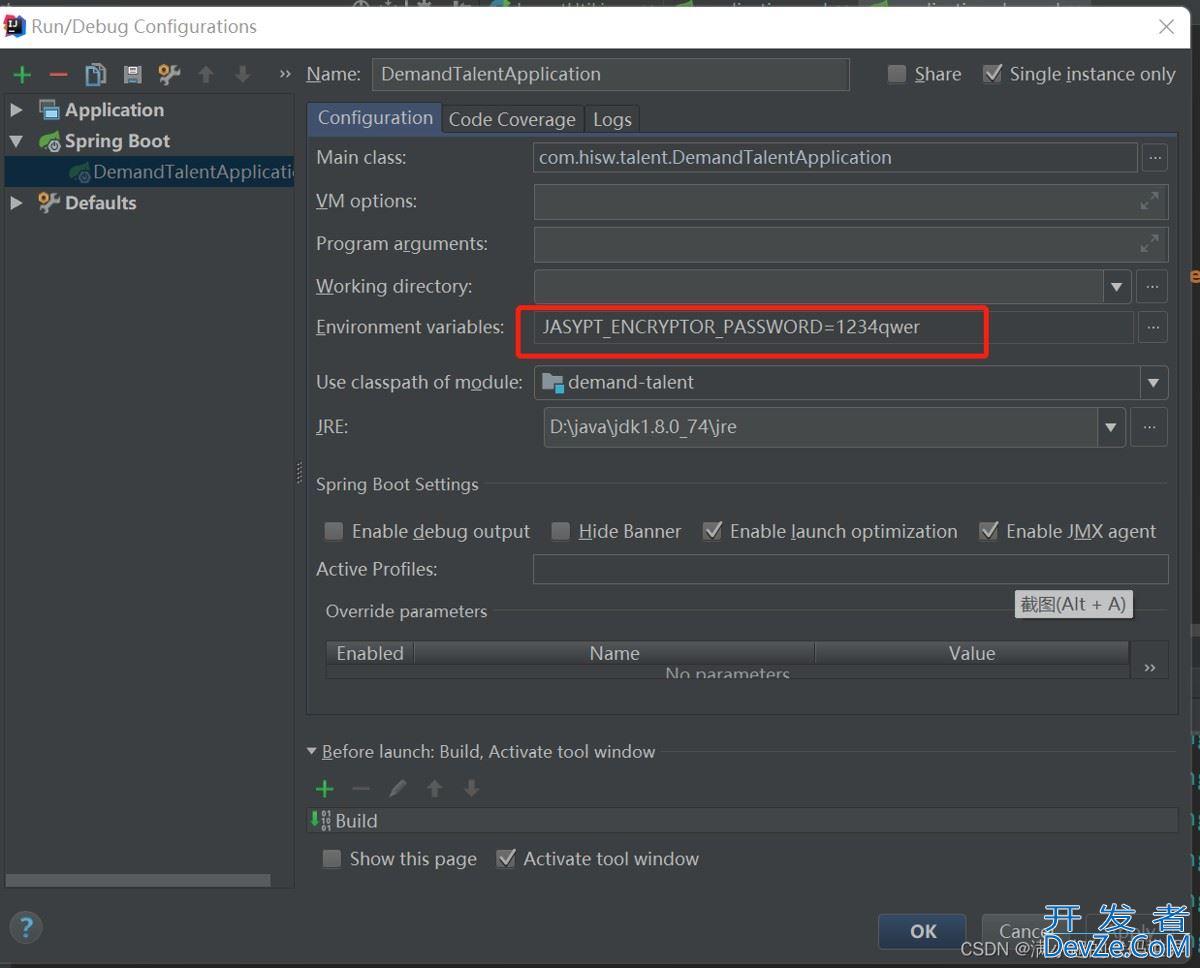
<dependency>
<grphpoupId>org.springframework.boot<js;/groupId>
<artifactId>spring‐boot‐starter‐tomcat</artifactId>
<scope>provided</scope&jsgt;
</dependency>
3)配置项目的目录结构


4)部署Tomcat


5)、必须编写一个SpringBootServletInitializer的子类,并调用configure方法
public class ServletInitializer extends SpringBootServletInitializer {
@Override
protected SpringApplicationBuilder configure(SpringApplicationBuilder application) {
//传入SpringBoot应用的主程序
return application.sources(SpringBoot04WebjspApplication.class);
}
}
6)、启动服务器就可以使用;
原理
jar包:执行SpringBoot主类的main方法,启动ioc容器,创建嵌入www.devze.com式的Servlet容器;
war包:启动服务器,服务器启动SpringBoot应用【SpringBootServletInitializer】,启动ioc容器;
到此这篇关于springboot使用外置的Servlet容器的文章就介绍到这了,更多相关springboot Servlet容器内容请搜索编程客栈(www.devze.com)以前的文章或继续浏览下面的相关文章希望大家以后多多支持编程客栈(www.devze.com)!


 加载中,请稍侯......
精彩评论