目录
- 核心功能实现
- 代码部分
- shader
- C#
- 具体步骤
- 总结
看到网上有用Unity做的桌面小宠物,就自己搜了些资料自己做了一个小Demo。
核心功能实现
简单说一下思路,有一个脚本跟一个Shader,通过脚本和Shader负责将Unity运行时的背景调成透明色。这个是通过调颜色来进行了。具体原理也不清楚,查了查资料大概是这样
窗口透明化与无边框
- 通过Windows API调用
SetWindowLong和dwmExtendFrameIntoClientArea实现透明背景和隐藏边框,需在相机设置中将Clear Flags设为Solid Color且透明度为01。 - 注意:背景色需与模型边缘颜色相近以避免毛边(如0x00BGR格式的COLORREF值)2。
- 通过Windows API调用
交互逻辑
- 点击穿透:通过检测鼠标坐标与模型碰撞器实现交互(如点击播放挠痒动画)编程客栈15。
- 拖拽限制:动态计算模型碰撞器与屏幕边缘距离,使用
Mathf.Clamp限制移动范围2。
代码部分
shader
Shader "Custom/MakeTransparent" {
  Properties {
    _MainTex ("Base (RGB)", 2D) = "white" {}
    _TransparentColorKey ("Transparent Color Key", Color) = (0,1,0,1)
    _TransparencyMargin ("Transparency Margin", Float) = 0.01
  }
  SubShader {
    Pass {
      Tags { "RenderType"="Opaque" }
      LOD 200

      CGPROGRA编程客栈M

      #pragma vertex VertexShaderFunction
      #pragma fragment PixelShaderFunction

      #include "UnityCG.cginc"

      struct VertexData
      {
        float4 position : POSITION;
        float2 uv : TEXCOORD0;
      };

      struct VertexToPixelData
      {
        float4 position : SV_POSITION;
        float2 uv : TEXCOORD0;
      };

      VertexToPixelData VertexShaderFunction(VertexData input)
      {
        VertexToPixelData output;
        output.position = UnityObjectToClipPos (input.position);
        output.uv = input.uv;
        return output;
      }

      sampler2D _MainTex;
      float3 _TransparentColorKey;
      float _TransparencyMargin;

      float4 PixelShaderFunction(VertexToPixelData input) : SV_Target
      {
        float4 color = tex2D(_MainTex, input.uv);

        float deltaR = abs(color.r - _TransparentColorKey.r);
        float deltaG = abs(color.g - _TransparentColorKey.g);
        float deltaB = abs(color.b - _TransparentColorKey.b);

     编程   if (deltaR < _TransparencyMargin && deltaG < _TransparencyMargin && deltaB < _TransparencyMargin)
        {
          return float4(0.0f, 0.0f, 0.0f, 0.0f);
        }

        return color;
      }
      ENDCG
    }
  }
}
C#
using System;
using System.Runtime.InteropServices;
using UnityEngine;

public class TransparentWindow : MonoBehaviour
{
    [SerializeField] private Material m_Material;

    private struct MARGINS
    {
        public int cxLeftWidth;
        public int cxRightWidth;
        public int cyTopHeight;
        public int cyBottomHeight;
    }

    [DllImport("user32.dll")]
    private static extern IntPtr GetActiveWindow();

    [DllImport("user32.dll")]
    private static extern int SetWindowLong(IntPtr hWnd, int nIndex, uint dwNewLong);

    [DllImport("Dwmapi.dll")]
    private static extern uint DwmExtendFrameIntoClientArea(IntPtr hWnd, ref MARGINS margins);

    [DllImport("user32.dll", EntryPoint = "SetWindowpos")]
    private static extern int SetWindowPos(IntPtr hwnd, IntPtr hwndInsertAfter, int x, int y, int cx, int cy,
        int uFlags);

    [DllImport("user32.dll")]
    static extern bool ShowWindowAsync(IntPtr hWnd, int nCmdShow);

    [DllImport("user32.dll", EntryPoint = "SetLayeredWindowAttributes")]
    static extern int SetLayeredWindowAttributes(IntPtr hwnd, int crKey, byte bAlpha, int dwFlags);

    [DllImport("User32.dll")]
    private static extern bool SetForegroundWindow(IntPtr hWnd);

    const int GWL_STYLE = -16;
    const int GWL_EXSTYLE = -20;
    const uint WS_POPUP = 0x80000000;
    const uint WS_VISIBLE = 0x10000000;

    const uint WS_EX_TOPMOST = 0x00000008;
    const uint WS_EX_LAYERED = 0x00080000;
    const uint WS_EX_TRANSPARENT = 0x00000020;

    const int SWP_FRAMECHANGED = 0x0020;
    const int SWP_SHOWWINDOW = 0x0040;
    const int LWA_ALPHA = 2;

    private IntPtr HWND_TOPMOST = new IntPtr(-1);

    private IntPtr _hwnd;

    void Start()
    {
#if !UNITY_EDITOR
    MARGINS margins = new MARGINS() { cxLeftWidth = -1 };
    _hwnd = GetActiveWindow();
    int fWidth = Screen.width;
    int fHeight = Screen.height;
        SetWindowLong(_hwnd, GWL_STYLE, WS_POPUP | WS_VISIBLE);
        //SetWindowLong(_hwnd, GWL_EXSTYLE, WS_EX_TOPMOST | WS_EX_LAYERED | WS_EX_TRANSPARENT);//若想鼠标穿透,则将这个注释恢复即可
        DwmExtendFrameIntoClientArea(_hwnd, ref margins);
        S编程客栈etWindowPos(_hwnd, HWND_TOPMOST, 0, 0, fWidth, fHeight, SWP编程客栈_FRAMECHANGED | SWP_SHOWWINDOW);
        ShowWindowAsync(_hwnd, 3); //Forces window to show in case of unresponsive app    // SW_SHOWMAXIMIZED(3)
#endif
    }

    void OnRenderImage(RenderTexture from, RenderTexture to)
    {
        Graphics.Blit(from, to, m_Material);
    }
}
具体步骤
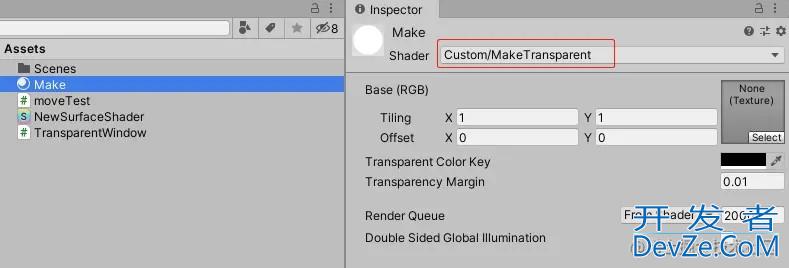
1.新建一个material(材质球),选择刚建立的Shader:
2.将刚写的C#脚本挂在摄像机上,摄像机的Clear Flags模式选择Solod Color,并将刚建立的材质球挂在脚本上。
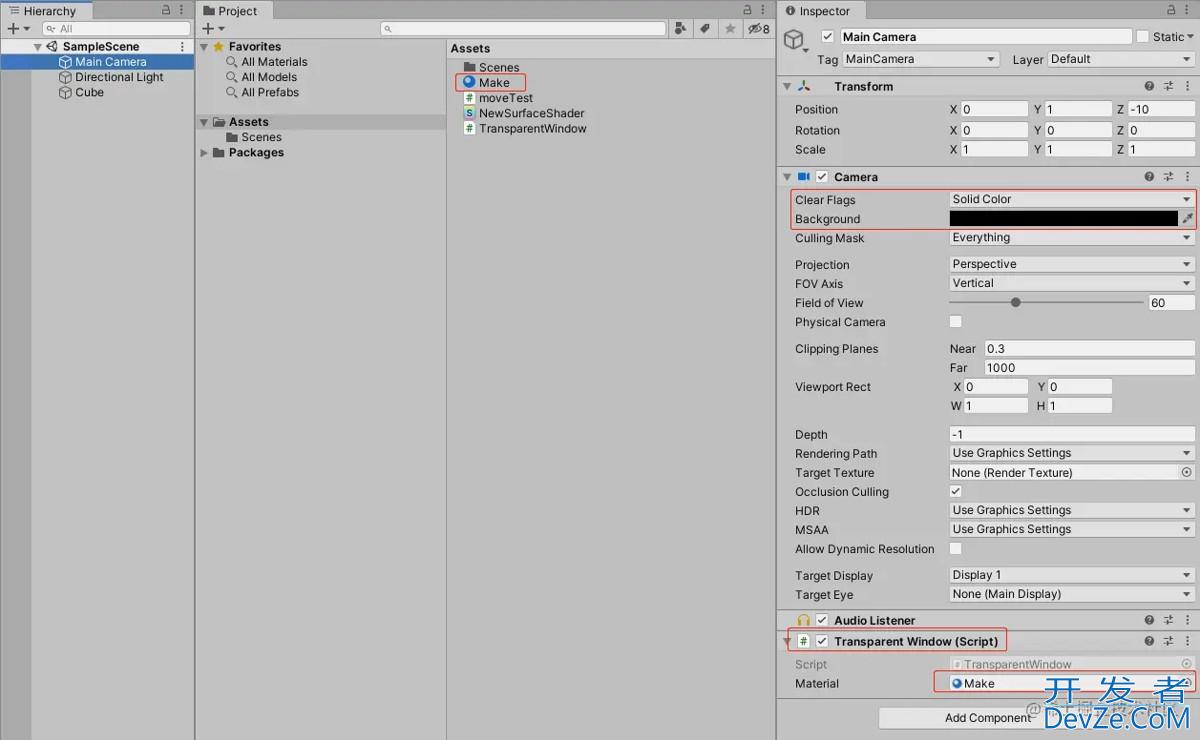
3.摄像机的Background属性要和材质球的Transparent Color Key属性一致:

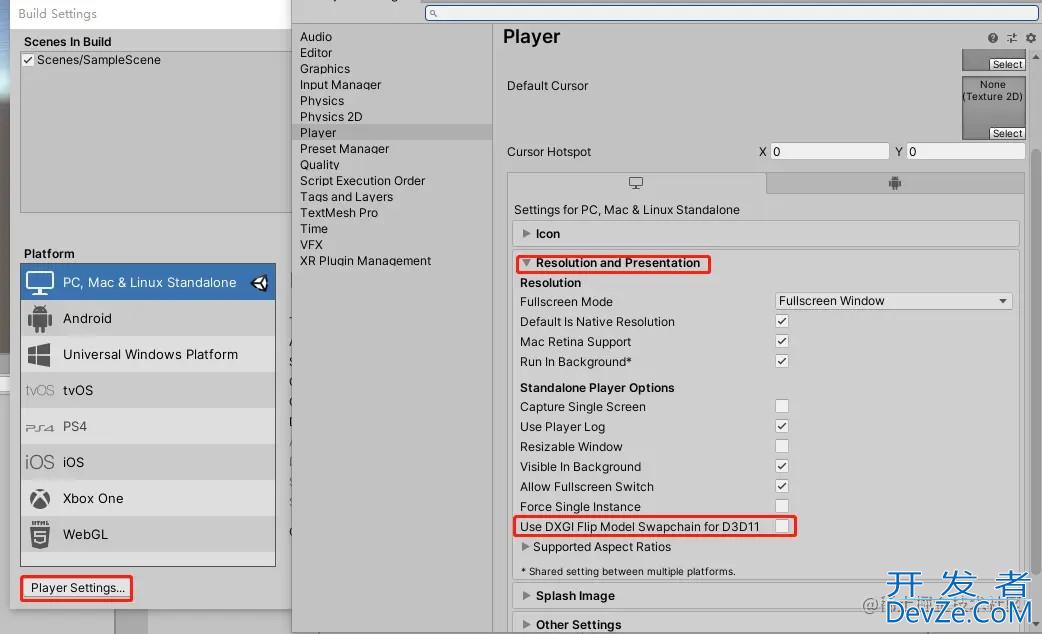
4.这里要注意一个点,unity19以上的版本需要设置一个东西。在playerSetting中将这个UseDXGIFlipModelSwapchainforD3D11取消勾选。
这样就可以实现窗口透明了,然后在场景里加一个模型跟动作就好啦
总结
到此这篇关于Unity-Demo游戏实现桌面小宠物的文章就介绍到这了,更多相关Unity-Demo桌面小宠物内容请搜索编程客栈(www.devze.com)以前的文章或继续浏览下面的相关文章希望大家以后多多支持编程客栈(www.devze.com)!
 加载中,请稍侯......
精彩评论