目录
- 引言
- 1. 使用 .NET 内置的 ZipFile 类
- 压缩单个文件夹
- 解压整个压缩包
- 压缩单个文件
- 2. 使用 ZipArchive 进行灵活操作
- 压缩多个文件和文件夹
- 解压(保留目录结构)
- 3. 使用 SharpZipLib 库
- 安装 SharpZipLib
- 压缩多个文件和文件夹
- 使用 SharpZipLib 解压
- 4. 错误处理与最佳实践
- 5. 方法对比与选择
- 总结
引言
在C#中处理文件和文件夹的压缩与解压,我们可使用微软内置的 System.IO.Compression 命名空间,也可选择功能更丰富的第三方库如 SharpZipLib。下面我将分别介绍几种常见方法,并提供处理多文件夹和文件混合压缩的方案。
1. 使用 .NET 内置的 ZipFile 类
.NET Framework 4.5 及以上版本和 .NET Core/.NET 5+ 提供了 ZipFile 类,适用于简单的压缩和解压场景。
压缩单个文件夹
using System.IO.Compression;

public static void CompressDirectory(string sourceDirectoryName, string destinationArchiveFileName)
{
    ZipFile.CreateFromDirectory(sourceDirectoryName, destinationArchiveFileName, CompressionLevel.Optimal, false);
}
值得注意的是,使用ZipFile创建压缩包,默认不会包含根目录。如果需要包含根目录,可以先将文件夹复制到一个临时目录,然后压缩该临时目录。
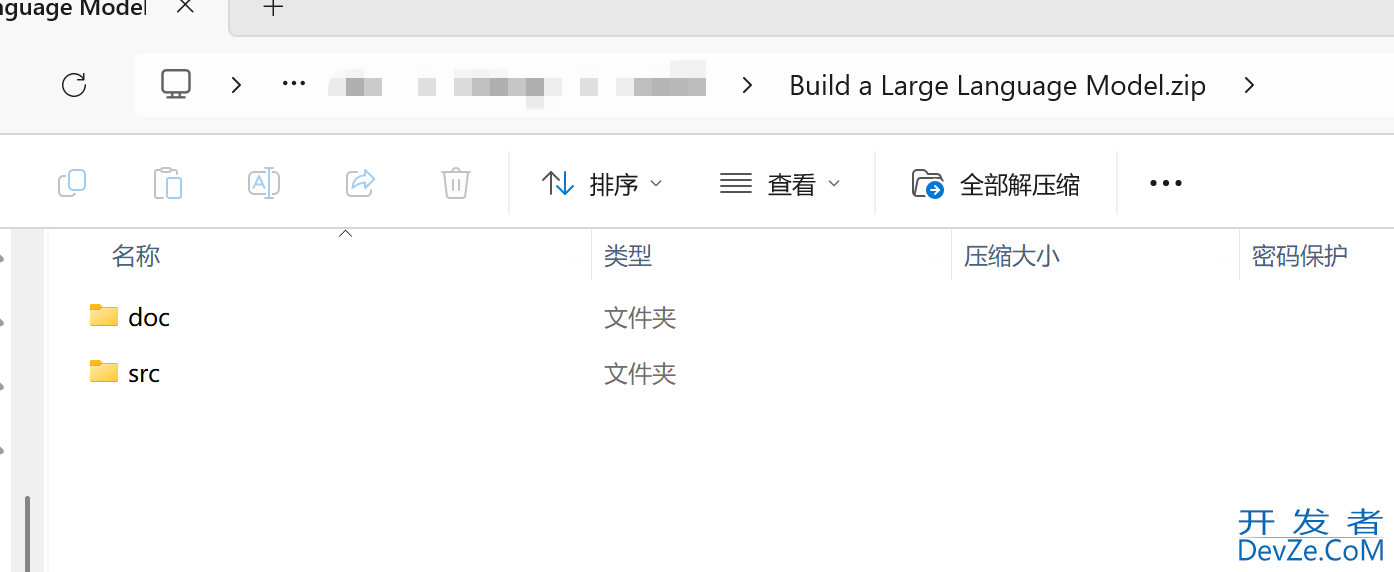
例如,我对一个名为“Build a Large Language Model”的目录进行压缩,它里面包含了“doc”和“src”两个目录,压缩后的效果如下图:
解压整个压缩包
public static void ExtractArchive(string sourceArchiveFileName, string destinationDirectoryName)
{
    ZipFile.ExtractToDirectory(sourceArchiveFileName, destinationDirectoryName);
}
压缩单个文件
压缩单个文件需要先创建临时目录,将文件复制进去后再压缩。
public static void CompressFile(string sourceFileName, string destinationArchiveFileName)
{
    string tempDir = Path.Combine(Path.GetTempPath(), Path.GetRandomFileName());
    Directory.CreateDirectory(tempDir);
    try
    {
        string destFile = Path.Combine(tempDir, Path.GetFileName(sourceFileName));
        File.Copy(sourceFileName, destFile);
        ZipFile.CreateFromDirectory(tempDir, destinationArchiveFileName, CompressionLevel.Optimal, false);
    }
    finally
    {
        Directory.Delete(tempDir, true);
    }
}
2. 使用 ZipArchive 进行灵活操作
ZipArchive 类提供了更精细的控制,适合混合压缩多个文件和文件夹。
压缩多个文件和文件夹
此方法递归地添加文件和文件夹,保持目录结构。
using System.IO.Compression;

        /// <summary>
        /// 压缩文件和文件夹到一个ZIP文件中
        /// </summary>
        /// <param name="zipPath">生成的压缩包路径</param>
        /// <param name="filesToZip">需要压缩的文件</param>
        /// <param name="foldersToZip">需要压缩的文件夹,默认没有</param>
        public static void CreateZipFile(string zipPath, string[]? filesToZip, string[]? foldersToZip = null,
            CompressionLevel compressionLevel = CompressionLevel.Optimal)
        {
            using (FileStream zipStream = new FileStream(zipPath, FileMode.Create))
            using (ZipArchive archive = new ZipArchive(zipStream, ZipArchiveMode.Create))
            {
                // 添加单个文件
                if (filesToZip != null)
                {
                    foreach (string file in filesToZip)
                    {
                        if (File.Exists(file))
                        {
                            string entryName = Path.GetFileName(file);
                            archive.CreateEntryFromFile(file, entryName);
                        }
                    }
                }

                // 添加文件夹(递归)
                if (foldersToZip != null)
                {
                    foreach (string folder in foldersToZip)
                    {
                        if (Directory.Exists(folder))
                        {
                            AddFolderToZip(archive, folder, Path.GetFileName(folder), compressionLevel);
                        }
                    }
                }
            }
        }

        /// <summary>
        /// 添加文件夹到ZIP归档中(递归)
        /// </summary>
        /// <param name="archive">ZIP压缩包</param>
        /// <param name="folderPath">文件夹路径</param>
        /// <param name="relativePath">相对路径<编程;/param>
        private static void AddFolderToZip(ZipArchive archive, string folderPath, string relativePath,
            CompressionLevel compressionLevel)
        {
            string[] files = Directory.GetFiles(folderPath);
            foreach (string file in files)
            {
                string entryName = Path.Combine(relativePath, Path.GetFileName(file));
                archive.CreateEntryFromFile(file, entryName);
            }

            string[] subfolders = Directory.GetDirectories(folderPath);
            foreach (string subfolder in subfolders)
            {
                string newRelativePath = Path.Combine(relativePath, Path.GetFileName(subfolder));
                AddFolderToZip(archive, subfolder, newRelativePath, compressionLevel);
            }
        }
解压(保留目录结构)
public static void ExtractZipFile(string zipPath, string extractPath)
{
    using (ZipArchive archive = ZipFile.OpenRead(zipPath))
    {
        foreach (ZipArchiveEntry entry in archive.Entries)
        {
            string fullPath = Path.Combine(extractPath, entry.FullName);
            string directory = Path.GetDirectoryName(fullPath);

            if (!Directory.Exists(directory))
                Directory.CreateDirectory(directory);

            if (!string.IsNullOrEmpty(entry.Name))
                entry.ExtractToFile(fullPath, overwrite: true);
        }
    }
}
3. 使用 SharpZipLib 库
对于更高级的需求(如加密、压缩级别控制、Unicode支持),可使用 SharpZipLib。
安装 SharpZipLib
通过 NuGet 包管理器安装:
Install-Package SharpZipLib
压缩多个文件和文件夹
using ICSharpCode.SharpZipLib.Zip;

public static void CreateZipWithSharpZipLib(string zipPath, string[] files, string[] folders, string password = null)
{
    using (ZipOutputStream zipStream = new ZipOutputStream(File.Create(zipPath)))
    {
        zipStream.SetLevel(9); // 压缩级别 (0-9)
        if (!string.IsNullOrEmpty(password))
            zipStream.Password = password;

        byte[] buffer = new byte[4096];

        // 添加文件
        foreach (string file in files)
        {
            if (File.Exists(file))
            {
                ZipEntry entry = new ZipEntry(Path.GetFileName(file));
                entry.DateTime = DateTime.Now;
                zipStream.PutNextEntry(entry);

                using (FileStream fs = File.OpenRead(file))
                {
                    int sourceBytes;
                    while ((sourceBytes = fs.Read(buffer, 0, buffer.Length)) > 0)
                    {
                        zipStream.Write(buffer, 0, sourceBytes);
     python               }
                }
                zipStream.CloseEntry();
            }
        }

        // 添加文件夹
        foreach (string folder in folders)
        {
            if (Directory.Exists(folder))
            {
                AddFolderToSharpZip(zipStream, folder, "", buffer);
            }
        }
        zipStream.Finish();
    }
}

private static void AddFolderToSharpZip(ZipOutputStream zipStream, string folderPath, string relativePath, byte[] buffer)
{
    string[] files = Directory.GetFiles(folderPath);
    foreach (string file in files)
    {
        string entryName = Path.Combine(relativePath, Path.GetFileName(file));
        ZipEntry entry = new ZipEntry(entryName);
        entry.DateTime = DateTime.Now;
        zipStream.PutNextEntry(entry);

        using (FileStream fs = File.OpenRead(file))
        {
            int sourceBytes;
            while ((sourceBytes = fs.Read(buffer, 0, buffer.Length)) > 0)
            {
                zipStream.Write(buffer, 0, sourceBytes);
            }
        }
        zipStream.CloseEntry();
    }

    string[] subfolders = Directory.GetDirectories(folderPath);
    foreach (string subfolder in subfolders)
    {
        string newRelativePath = Path.Combine(relativePath, Path.GetFileName(subfolder));
        AddFolderToSharpZip(zipStream, subfolder, newRelativePath, buffer);
    }
}
使用 SharpZipLib 解压
public static void ExtractWithSharpZipLib(string zipPath, string extractPath, string password = null)
{
    using (ZipInputStream zipStream = new ZipInputStream(File.OpenRead(zipPath)))
    {
        zipStream.Password = password;
        ZipEntry entry;
        while ((entry = zipStream.GetNextEntry()) != null)
        {
            string fullPath = Pat编程客栈h.Combine(extractPath, entry.Name);
            string directory = Path.GetDirectoryName(fullPath);

            if (!Directory.Exists(directory))
                Directory.CreateDirectory(directory);

            if (!string.IsNullOrEmpty(entry.Name))
            {
                using (FileStream streamWriter = File.Create(fullPath))
                {
                    byte[] data = new byte[4096];
                    int size;
                    while (编程客栈(size = zipStream.Read(data, 0, data.Length)) > 0)
                    {
                        streamWriter.Write(data, 0, size);
                    }
                }
            }
        }
    }
}
4. 错误处理与最佳实践
进行压缩和解压操作时,务必添加错误处理。
try
{
    // 你的压缩或解压代码
}
catch (FileNotFoundException ex)
{
    Console.WriteLine($"文件未找到: {ex.Message}");
}
catch (DirectoryNotFoundException ex)
{
    Console.WriteLine($"目录未找到: {ex.Message}");
}
catch (IOException ex)
{
    Consolwww.devze.come.WriteLine($"IO错误: {ex.Message}");
}
catch (UnauthorizedAccessException ex)
{
    Console.WriteLine($"权限错误: {ex.Message}");
}
catch (Exception ex)
{
    Console.WriteLine($"未知错误: {ex.Message}");
}
5. 方法对比与选择
我们可以根据需求选择合适的方法:
| 方法特性 | ZipFile (内置) | ZipArchive (内置) | SharpZipLib (第三方) |
|---|---|---|---|
| 易用性 | 高 | 中 | 中 |
| 功能丰富度 | 基础 | 中等 | 高(加密、Unicode支持等) |
| 性能 | 良好 | 良好 | 良好 |
| 无需额外依赖 | 是 | 是 | 否 |
| 跨平台兼容性 | 是 | 是 | 是 |
| 推荐场景 | 简单压缩/解压 | 需精细控制 | 复杂需求(如加密) |
总结
在C#中实现zip压缩和解压,我们可根据需求选择:
- 简单场景:使用内置的
ZipFile类(ZipFile.CreateFromDirectory和ZipFile.ExtractToDirectory)最方便。 - 需精细控制或多文件/文件夹混合:使用
ZipArchive类逐项添加内容更灵活。 - 有高级需求(如加密、更高压缩比):
SharpZipLib等第三方库功能更强大。
处理多文件和文件夹时,递归添加是保持目录结构的关键。无论用哪种方法,都请注意添加适当的错误处理(如 try-catch 块)以确保程序健壮性。
到此这篇关于C#压缩解压文件的常用方法的文章就介绍到这了,更多相关C#压缩解压文件内容请搜索编程客栈(www.devze.com)以前的文章或继续浏览下面的相关文章希望大家以后多多支持编程客栈(www.devze.com)!




 加载中,请稍侯......
精彩评论