目录
- 前言
- 一、前置知识与环境准备
- 1.1 核心技术栈
- 1.2 环境安装步骤
- 步骤1:安装python(已经装了的话这步就跳过)
- 步骤2:安装依赖库
- 步骤3:确认KingbaseES数据库状态
- 二、项目架构设计
- 三、后端核心实现(app.py)
- 3.1 初始化Flask与数据库配置
- 3.2 表结构初始化(建表)
- 3.3 用户数据增删改查实现
- 3.3.1 首页:展示所有用户(查-列表)
- 3.3.2 新增用户(增)
- 3.3.3 查看用户详情(查-单条)
- 3.3.4 修改用户余额(改)
- 3.3.5 删除用户(删)
- 四、前端模板实现(templates文件夹)
- 4.1 基础模板(base.html)
- 4.2 首页模板(index.html)
- 4.3 表结构初始化模板(init_schema.html)
- 4.4 新增用户模板(create_user.html)
- 4.5 用户详情模板(user_detail.html)
- 4.6 余额修改模板(update_balance.html)
- 五、系统运行与测试
- 5.1 启动步骤
- 5.2 功能测试流程
- 步骤1:初始化表结构
- 步骤2:新增用户
- 步骤3:查看用户详情
- 步骤4:修改用户余额
- 步骤5:删除用户
- 六、常见问题与解决方案
- 6.1 数据库连接失败
- 6.2 建表失败
- 6.3 余额修改时提示“非数字”
- 七、项目扩展建议
- 八、总结
前言
现在国产化替代是大趋势,国产数据库的应用范围越来越广,金仓数据库(KingbaseES)作为其中的佼佼者,在政务、金融等领域部署得特别多。今天我就带大家从0到1,亲手实现用Python操作KingbaseES数据库,还会基于Flask框架搭一个可视化的网页管理系统,数据的增删改查(CRUD)全流程都能覆盖到,Python开发者和数据库管理员跟着学,都能掌握这套实用技能。
一、前置知识与环境准备
开始动手前,咱们得把相关的环境和工具准备好,这样后面开发的时候才不会卡壳。
1.1 核心技术栈
这次做项目用的技术都不复杂,也不用复杂的框架,轻量化还好上手,具体有这些:
- 后端框架:Flask(这是个轻量级的Python Web框架,用来快速搭网页服务特别方便)
- 数据库驱动:psycopg2(KingbaseES兼容PostgreSQL协议,直接用这个驱动就能连接数据库)
- 前端技术:HTML + 原生css(不用额外学前端框架,咱们把核心功能实现了就行)
- 数据库:KingbaseES V8/R3(我这次用的是比较常见的版本,其他版本操作步骤都一样)
1.2 环境安装步骤
步骤1:安装Python(已经装了的话这步就跳过)
直接去Python官网下载3.7及以上版本,安装的时候记得勾选“Add Python to PATH”,这样后面在命令行里就能直接调用python和pip命令了。
步骤2:安装依赖库
打开命令行,输下面这些命令,就能把项目需要的依赖库装好:
# 安装Flask框架
pip install flask
# 安装KingbaseES数据库驱动(兼容PostgreSQL)
pip install psycopg2-binary
步骤3:确认KingbaseES数据库状态
- 首先得确保KingbaseES数据库已经启动了,而且能通过IP(比如本地的
127.0.0.1)和端口(默认常用端口是54321)访问到。 - 提前创建好数据库,我这次用的是
TEST库,大家可以用KingbaseES的图形化工具KingbaseManager来创建。 - 还要准备好数据库的账号密码,我这里用的是默认管理员账号
system,密码大家可以自己修改。
二、项目架构设计
为了让代码结构清晰,后面维护起来也方便,咱们采用“后端逻辑+前端模板”的分层设计,整个项目的目录结构是这样的:
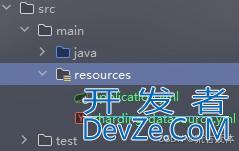
kingbase_web_manager/  # 项目根目录
├── app.py             # 后端核心逻辑(包含Flask服务、数据库操作、路由定义)
└── templates/         # 前端HTML模板文件夹(用继承式设计,减少重复代码)
    ├── base.html      # 基础模板(放公共头部、样式、消息提示这些)
    ├── index.html     # 首页(用来展示用户列表)
    ├── init_schema.html  # 表结构初始化页面
    ├── create_user.html  # 新增用户页面
    ├── user_detail.html  # 用户详情页面
    └── update_balance.html  # 余额修改页面
- 后端:通过Flask定义路由,处理前端发来的HTTP请求,再调用
psycopg2去操作KingbaseES数据库。 - 前端:用HTML模板继承的方式,
base.html作为父模板,这样所有页面风格能统一,也能少写很多重复代码。
三、后端核心实现(app.py)
后端就像是整个系统的“大脑”,负责连接数据库、处理业务逻辑,最后把数据返回给前端。下面我分模块给大家讲核心代码怎么写。
3.1 初始化Flask与数据库配置
首先创建app.py文件,先把Flask应用初始化好,再配置KingbaseES数据库的连接参数:
from flask import Flask, jsonify, request, render_template, redirect, url_for, flash
import psycopg2  # KingbaseES数据库驱动
import psycopg2.extras as extras  # 扩展功能(如DictCursor,让查询结果为字典格式)

# 初始化Flask应用
app = Flask(__name__)
# 配置secret_key(用于flash消息提示,防止跨站请求伪造)
app.secret_key = 'kingbase_web_manager_2024'

# --------------------------
# KingbaseES数据库连接配置
# --------------------------
DB_CFG = dict(
    host="127.0.0.1",    # 数据库IP(本地为127.0.0.1,远程需填实际IP)
    port=54321,          # KingbaseES默认常见端口(不同环境可能为5432,需确认)
    dbname="TEST",       # 数据库名称(提前创建好)
    user="system",       # 数据库账号(管理员账号)
    password="jcsjk520.",# 数据库密码(替换为你的实际密码)
    connect_timeout=5,   # 连接超时时间(5秒)
)

# --------------------------
# 数据库连接工具函数
# --------------------------
def get_conn():
    """获取KingbaseES数据库连接"""
    try:
        # 使用psycopg2.connect连接数据库,**DB_CFG表示解包配置字典
        conn = psycopg2.connect(**DB_CFG)
        return conn
    except Exception as e:
        # 连接失败时抛出异常(后续路由会捕获处理)
        raise Exception(f"数据库连接失败: {str(e)}")
3.2 表结构初始化(建表)
第一次用的时候,得先创建用户表(t_user),咱们可以通过/init-schema这个路由,在网页端触发建表操作:
@app.route('/init-schema', methods=['GET', 'POST'])
def init_schema():
    """初始化用户表结构(GET请求显示页面,POST请求执行建表)"""
    # 1. POST请求:用户点击"初始化"按钮,执行建表SQL
    if request.method == 'POST':
        # 定义建表SQL(if not exists确保表不存在时才创建,避免重复执行报错)
        create_table_sql = """
        create table if not exists t_user(
            id          serial primary key,  # 自增主键(用户ID)
            name        varchar(64) not null, # 用户名(非空)
            balance     numeric(12,2) default 0, # 余额(默认0,支持两位小数)
            created_at  timestamp default current_timestamp # 创建时间(默认当前时间)
        );
        """
        try:
            # 使用with语句自动管理连接和游标(无需手动关闭)
            with get_conn() as conn, conn.cursor() as cur:
                cur.execute(create_table_sql)  # 执行建表SQL
            # 建表成功,通过flash传递成功消息(前端会显示)
            flash('表结构初始化成功!', 'success')
        except Exception as e:
            # 建表失败,传递错误消息
            flash(f'初始化失败: {str(e)}', 'danger')
        # 无论成功与否,跳转回首页
        return redirect(url_for('index'))

    # 2. GET请求:显示初始化表结构的页面
    return render_template('init_schema.html')
3.3 用户数据增删改查实现
接下来咱们实现核心的CRUD功能,每个功能对应一个路由,专门处理前端的请求,然后操作数据库。
3.3.1 首页:展示所有用户(查-列表)
首页/这个路由会查询t_user表里的所有数据,然后把数据传给前端模板展示出来:
@app.route('/')
def index():
    """首页:展示所有用户列表"""
    try:
        # 查询所有用户数据(按ID升序,可选)
        query_sql = "select id, name, balance, created_at from t_user order by id;"
        # 使用DictCursor,让查询结果为字典(便于前端通过键名获取值)
        with get_conn() as conn, conn.cursor(cursor_factory=extras.DictCursor) as cur:
            cur.execute(query_sql)
            # fetchall()获取所有结果,转换为列表(每个元素是字典)
            users = [dict(row) for row in cur.fetchall()]
        # 渲染首页模板,传递用户列表数据
        return render_template('index.html', users=users)
    except Exception as e:
        # 查询失败,显示错误消息,传递空列表
        flash(f'数据库查询错误: {str(e)}', 'danger'编程客栈)
        return render_template('index.html', users=[])
3.3.2 新增用户(增)
通过/user/create这个路由实现新增用户的功能,还能让用户输入用户名和初始余额:
@app.route('/user/create', methods=['GET', 'POST'])
def create_user():
    """新增用户(GET显示表单,POST提交数据)"""
    if request.method == 'POST':
        # 1. 获取前端表单提交的数据(request.form用于获取POST表单数据)
        name = request.form.get('name')  # 用户名(必填)
        balance = request.form.get('balance', 0.0)  # 初始余额(可选,默认0)

        # 2. 数据校验:用户名不能为空
        if not name:
            flash('用户名不能为空!', 'danger')
            return render_template('create_user.html')  # 校验失败,返回表单页面

        try:
            # 3. 数据格式转换:余额转为浮点数(防止非数字输入)
            balance = float(balance) if balance else 0.0
            # 4. 执行插入SQL(returning id返回新增用户的ID)
            insert_sql = "insert into t_user(name, balance) values (%s, %s) returning id;"
            with get_conn() as conn, conn.cursor() as cur:
                cur.execute(insert_sql, (name, balance))  # %s为参数占位符(防止SQL注入)
                user_id = cur.fetchone()[0]  # 获取返回的用户ID

            # 5. 新增成功,跳转回首页
            flash(f'用户创建成功!用户ID: {user_id}', 'success')
            return redirect(url_for('index'))
        except ValueError:
            # 余额非数字时捕获异常
            flash('初始余额必须为数字!', 'danger')
        except Exception as e:
            # 其他错误(如数据库异常)
            flash(f'用户创建失败: {str(e)}', 'danger')

    # GET请求:显示新增用户表单
    return render_template('create_user.html')
3.3.3 查看用户详情(查-单条)
通过用户ID查询单条用户数据,然后展示详细信息:
@app.route('/user/<int:user_id>')
def get_user(user_id):
    """查看单个用户详情(通过URL路径传递user_id)"""
    try:
        # 查询指定ID的用户数据
        query_sql = "select id, name, balance, created_at from t_user where id=%s;"
        with get_conn() as conn, conn.cursor(cursor_factory=extras.DictCursor) as cur:
            cur.execute(query_sql, (user_id,))  # 传递user_id参数
            user = dict(cur.fetchone()) if cur.rowcount > 0 else None  # 转换为字典

        # 校验用户是否存在
        if not user:
            flash('该用户不存在!', 'danger')
            return redirect(url_for('index'))  # 不存在则跳转回首页

        # 渲染详情页面,传递用户数据
        return render_template('user_detail.html', user=user)
    except Exception as e:
        flash(f'查询用户失败: {str(e)}', 'danger')
        return redirect(url_for('index'))
3.3.4 修改用户余额(改)
通过/user/<user_id>/balance这个路由调整用户余额,不管是增加还是减少都能实现:
@app.route('/user/<int:user_id>/balance', methods=['GET', 'POST'])
def update_balance(user_id):
    """修改用户余额(GET显示表单,POST提交修改)"""
    if request.method == 'POST':
        try:
            # 1. 获取余额变动值(delta:正数增加,负数减少)
            delta = float(request.form.get('delta', 0))
            # 2. 执行更新SQL(balance = balance + %s 实现增量更新)
            update_sql = "update t_user set balance = balance + %s where id=%s;"
            with get_conn() as conn, conn.cursor() as cur:
                cur.execute(update_sql, (delta, user_id))
                # 校验用户是否存在(rowcount为受影响行数,0表示无此用户)
                if cur.rowcount == 0:
                    flash('该用户不存在!', 'danger')
                    return redirect(url_for('index'))

            # 3. 更新成功,跳转回用户详情页
            flash('余额更新成功!', 'success')
            return redirect(url_for('get_user', user_id=user_id))
        except ValueError:
            # 变动值非数字时捕获异常
            flash('余额变动值必须为数字!', 'danger')
        except Exception as e:
            flash(f'余额更新失败: {str(e)}', 'danger')

    # GET请求:显示余额修改表单(先查询当前用户信息)
    try:
        query_sql = "select id, name, balance from t_user where id=%s;"
        with get_conn() as conn, conn.cursor(cursor_factory=extras.DictCursor) as cur:
            cur.execute(query_sql, (user_id,))
            user = dict(cur.fetchone()) if cur.rowcount > 0 else None

        if not user:
            flash('该用户不存在!', 'danger')
            return redirect(url_for('index'))

        # 渲染修改余额表单,传递当前用户信息
        return render_template('update_balance.html', user=user)
    except Exception as e:
        flash(f'查询用户信息失败: {str(e)}', 'danger')
        return redirect(url_for('index'))
3.3.5 删除用户(删)
通过/user/<user_id>/delete这个路由删除指定用户,为了防止误删,还得让用户确认一下操作:
@app.route('/user/<int:user_id>/delete', mpythonethods=['POST'])
def delete_user(user_id):
    """删除用户(仅支持POST请求,避免GET请求误触发)"""
    try:
        # 执行删除SQL
        delete_sql = "delete from t_user where id=%s;"
        with get_conn() as conn, conn.cursor() as cur:
            cur.execute(delete_sql, (user_id,))
            if cur.rowcount == 0:
                flash('该用户不存在!', 'danger')
            else:
                flash('用户删除成功!', 'success')
    except Exception as e:
        flash(f'用户删除失败: {str(e)}', 'danger')

    # 删除后跳转回首页
    return redirect(url_for('index'))

# --------------------------
# 启动Flask服务
# --------------------------
if __name__ == '__main__':
    # debug=True:开发模式(代码修改后自动重启,错误信息显示在网页上)
    app.run(debug=True)
四、前端模板实现(templates文件夹)
前端咱们用“继承式模板”来设计,base.html里定义公共的样式和页面结构,其他模板都继承它,这样能少写很多重复代码。
4.1 基础模板(base.html)
所有页面的公共部分,像头部标题、样式、消息提示这些,都放在这个模板里:
<!DOCTYPE html>
<html lang="zh-CN">
<head>
    <meta charset="UTF-8">
    <meta name="viewport" content="width=device-width, initial-scale=1.0">
    <title>Kingbase用户管理系统</title>
    <!-- 公共CSS样式(统一页面风格) -->
    <style>
        .container { max-width: 1200px; margin: 0 auto; padding: 20px; }
        .flash { padding: 12px; margin: 15px 0; border-radius: 4px; font-size: 14px; }
        .success { background-color: #d4edda; color: #155724; border: 1px solid #c3e6cb; }
        .danger { background-color: #f8d7da; color: #721c24; border: 1px solid #f5c6cb; }
        table { width: 100%; border-collapse: collapse; margin: 20px 0; }
        th, td { padding: 12px 15px; border: 1px solid #ddd; text-align: left; }
        th { background-color: #f8f9fa; font-weight: bold; }
        tr:hover { background-color: #f8f9fa; }
        .btn { display: inline-block; padding: 8px 16px; margin: 0 5px; text-decoration: none;
               color: #fff; border-radius: 4px; border: none; cursor: pointer; font-size: 14px; }
        .btn-primary { background-color: #007bff; }
        .btn-success { background-color: #28a745; }
        .btn-danger { background-color: #dc35js45; }
        .form-group { margin-bottom: 20px; }
        label { display: block; margin-bottom: 8px; font-weight: bold; }
        input { padding: 10px; width: 350px; border: 1px solid #ddd; border-radius: 4px;
                font-size: 14px; box-sizing: border-box; }
        h1, h2 { color: #333; margin-bottom: 20px; }
        .operate-btn-group { margin: 20px 0; }
    </style>
</head>
<body>
    <div class="container">
        <!-- 页面标题(点击可返回首页) -->
        <h1><a href="/" rel="external nofollow"  rel="external nofollow"  rel="external nofollow"  rel="external nofollow" >Kingbase用户管理系统</a></h1>

        <!-- 消息提示区域(显示success/danger消息) -->
        <div>
            {% with messages = get_flashed_messages(with_categories=true) %}
                {% if messages %}
                    {% for category, message in messages %}
                        <div class="flash {{ category }}">{{ message }}</div>
                    {% endfor %}
                {% endif %}
            {% endwith %}
        </div>

        <!-- 子模板内容区域(由其他页面填充) -->
        {% block content %}{% endblock %}
    </div>
</body>
</html>
4.2 首页模板(index.html)
这个模板继承base.html,主要用来展示用户列表和操作按钮:
{% extends "base.html" %}  <!-- 继承基础模板 -->

{% block content %}  <!-- 填充content区域 -->
    <!-- 操作按钮组(初始化表结构、新增用户) -->
    <div class="operate-btn-group">
        <a href="/init-schema" rel="external nofollow"  class="btn btn-primary">初始化表结构</a>
        <a href="/user/create" rel="external nofollow"  class="btn btn-success">添加新用户</a>
    </div>

    <!-- 用户列表标题 -->
    <h2>用户列表</h2>

    <!-- 若有用户数据,展示表格;否则提示无数据 -->
    {% if users %}
        <table>
            <tr>
                <th>用户ID</th>
                <th>用户名</th>
                <th>账户余额(元)</th>
                <th>创建时间</th>
                <th>操作</th>
            </tr>
            {% for user in users %}  <!-- 循环遍历用户列表 -->
            <tr>
                <td>{{ user.id }}</td>
                <td>{{ user.name }}</td>
                <td>{{ user.balance }}</td>
                <td>{{ user.created_at }}</td>
                <td>
                    <!-- 查看详情按钮 -->
                    <a href="/user/{{ user.id }}" rel="external nofollow"  rel="external nofollow"  class="btn btn-primary">查看</a>
                    <!-- 调整余额按钮 -->
                    <a href="/user/{{ user.id }}/balance" rel="external nofollow"  rel="external nofollow"  class="btn btn-success">调整余额</a>
                    <!-- 删除按钮(POST请求,需用表单包裹) -->
                    <form action="/user/{{ user.id }}/delete" method="post">
                        <button type="submit" class="btn btn-danger"
                                onclick="return confirm('确定要删除该用户吗?删除后不可恢复!')">
                            删除
                        </button>
                    </form>
                </td>
            </tr>
            {% endfor %}
        </table>
    {% else %}
        <p>暂无用户数据,请先初始化表结构并添加用户。</p>
    {% endif %}
{% endblock %}

4.3 表结构初始化模板(init_schema.html)
这个模板提供一个初始化表结构的确认按钮,点击就能触发建表:
{% extends "base.html" %}

{% block content %}
    <h2>初始化用户表结构</h2>
    <p>
        点击下方按钮创建用户表(t_user),若表已存在则不会重复创建。
    </p>
    <!-- 提交表单(POST请求触发建表) -->
    <form method="post">
        <button type="submit" class="btn btn-success">确认初始化表结构</button>
        <a href="/" rel="external nofollow"  rel="external nofollow"  rel="external nofollow"  rel="external nofollow"  class="btn btn-primary">返回首页</a>
    </form>
{% endblock %}

4.4 新增用户模板(create_user.html)
这里有个表单,用户可以输入用户名和初始余额,用来新增用户:
{% extends "base.html" %}

{% block content %}
    <h2>添加新用户</h2>
    <form method="post">
        <!-- 用户名输入框(必填) -->
        <div class="form-group">
            <label for="name">用户名 <span>*</span></label>
            <input type="text" id="name" name="name" required
                   placeholder="请输入用户名(如:张三)">
        </div>
        <!-- 初始余额输入框(可选) -->
        <div class="form-group">
            <label for="balance">初始余额(元)</label>
            <input type="number" id="balance" name="balance" step="0.01" min="0"
                   placeholder="请输入数字(默认0,如:100.50)">
        </div>
        <!-- 提交与返回按钮 -->
        <button type="submit" class="btn btn-success">创建用户</button>
        <a href="/" rel="external nofollow"  rel="external nofollow"  rel="external nofollow"  rel="external nofollow"  class="btn btn-primary">返回首页</a>
    </form>
{% endblock %}

4.5 用户详情模板(user_detail.html)
这个模板用来展示单个用户的详细信息,看得更清楚:
{% extends "base.html" %}

{% block content %}
    <h2>用户详情</h2>
    {% if user %}
        <table>
            <tr>
                <th>用户ID</th>
         peXfAGOMKh       <td>{{ user.id }}</td>
            </tr>
            <tr>
                <th>用户名</th>
                <td>{{ user.name }}</td>
            </tr>
            <tr>
                <th>账户余额(元)</th>
                <td>{{ user.balance }}</td>
            </tr>
            <tr>
                <th>创建时间</th>
                <td>{{ user.created_at }}</td>
            </tr>
        </table>
        <!-- 操作按钮 -->
        <div class="operate-btn-group">
            <a href="/user/{{ user.id }}/balance" rel="external nofollow"  rel="external nofollow"  class="btn btn-success">调整余额</a>
            <a href="/" rel="external nofollow"  rel="external nofollow"  rel="external nofollow"  rel="external nofollow"  class="btn btn-primary">返回用户列表</a>
        </div>
    {% endif %}
{% endblock %}

4.6 余额修改模板(update_balance.html)
这里有个输入框,用户可以输入余额变动值,用来调整用户余额:
{% extends "base.html" %}

{% block content %}
    <h2>调整用户余额</h2>
    {% if user %}
        <!-- 显示当前用户信息 -->
        <p>
            当前用户:<strong>{{ user.name }}</strong>(ID:{{ user.id }})
        </p>
        <p>
            当前余额:<strong>{{ user.balance }} 元</strong>
        </p>

        <!-- 余额变动表单 -->
        <form method="post">
            <div class="form-group">
                <label for="delta">余额变动值(元)</label>
                <input type="number" id="delta" name="delta" step="0.01" required
                       placeholder="正数增加,负数减少(如:50.00 或 -20.50)">
                <small>
                    提示:输入正数表示增加余额,输入负数表示减少余额(如输入-10表示减少10元)
                </small>
            </div>
            <!-- 提编程客栈交与返回按钮 -->
            <button type="submit" class="btn btn-success">确认更新</button>
            <a href="/user/{{ user.id }}" rel="external nofollow"  rel="external nofollow"  class="btn btn-primary">返回详情</a>
        </form>
    {% endif %}
{% endblock %}

五、系统运行与测试
代码都写完之后,咱们就可以启动系统,测试一下功能能不能正常用了。
5.1 启动步骤
- 首先得确保KingbaseES数据库已经启动了,而且DB_CFG里配置的IP、端口、账号密码都是对的。
- 找到项目根目录(就是app.py所在的文件夹),打开命令行,输入下面这个命令:
python app.py
- 看到下面这样的输出,就说明Flask服务启动成功了:
* Serving Flask app 'app'
* Debug mode: on
WARNING: This is a development server. Do not use it in a production deployment.
* Running on http://127.0.0.1:5000
Press CTRL+C to quit
5.2 功能测试流程
步骤1:初始化表结构
- 打开浏览器,访问
http://127.0.0.1:5000,点击“初始化表结构”按钮,页面会提示“表结构初始化成功”。 - 这时候大家可以用KingbaseManager工具查一下,
TEST库里已经创建好t_user表了。
步骤2:新增用户
- 点击页面上的“添加新用户”,输入用户名(比如“张三”),再填个初始余额(比如“200”),然后点击“创建用户”,页面会提示“用户创建成功”。
- 回到首页,就能看到刚才新增的用户数据了。
步骤3:查看用户详情
- 找到刚才新增的用户,点击用户那一行的“查看”按钮,就能进入详情页,用户的ID、姓名、余额、创建时间都能看到。
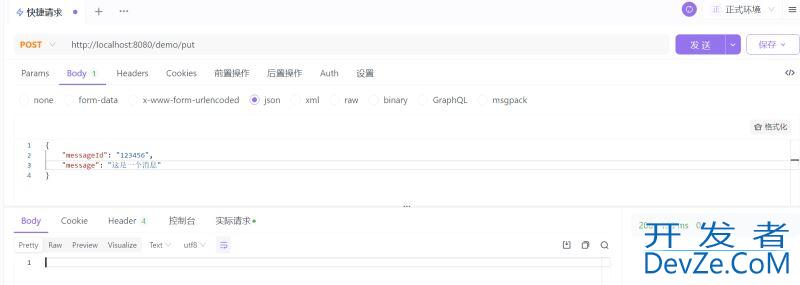
步骤4:修改用户余额
- 在详情页点击“调整余额”,输入变动值(比如“50”,意思是增加50元),然后点击“确认更新”,页面会提示“余额更新成功”。
- 再回到详情页,就会发现余额已经变成250元了。
步骤5:删除用户
- 回到首页,找到要删除的用户,点击“删除”按钮,会弹出一个确认框,点击“确定”,页面提示“用户删除成功”。
- 这时候首页就不会再显示这个用户的数据了。
六、常见问题与解决方案
开发和测试的时候,大家可能会遇到一些问题,我整理了几个常见的,还给出了对应的解决办法:
6.1 数据库连接失败
- 错误提示:
数据库连接失败: could not connect to server: Connection refused - 原因:要么是KingbaseES数据库没启动,要么是IP或者端口配置错了。
- 解决方案:
- 先检查KingbaseES服务有没有启动,可以通过服务管理器或者
sys_ctl命令来查看。 - 确认一下
DB_CFG里的host(远程的话要填实际IP,本地就是127.0.0.1)和port(默认是54321,有些环境可能是5432)对不对。 - 还要确保数据库账号密码是对的,而且
system账号有操作TEST库的权限。
- 先检查KingbaseES服务有没有启动,可以通过服务管理器或者
6.2 建表失败
- 错误提示:
初始化失败: permission denied for schema public - 原因:
system账号对public模式没有创建表的权限。 - 解决方案:
- 用KingbaseManager登录
TEST库,执行下面这个授权SQL:
- 用KingbaseManager登录
grant create on schema public to system;
执行完之后,再重新做一次初始化操作就行。
6.3 余额修改时提示“非数字”
- 错误提示:
余额变动值必须为数字! - 原因:在输入余额变动值的时候,里面混了非数字字符,比如字母、中文这些。
- 解决方案:输入的时候注意一下,只填数字、小数点(比如“30.5”)或者负号(比如“-10”)就可以了。
七、项目扩展建议
这个项目目前实现了基础的用户管理功能,大家可以根据自己的实际需求再扩展一下,比如这些方向:
- 用户认证:加个登录功能(可以用Flask-Login),这样能防止没授权的人随便访问系统。
- 分页查询:要是用户数据特别多,在首页加个分页功能会更方便,用SQL的
limit和offset就能实现。 - 数据校验:新增用户的时候,加个用户名唯一性校验,先查一下数据库里有没有重名的,避免重复创建。
- 日志记录:用
logging模块记录数据库的操作日志,后面要是出了问题,排查起来会更方便。 - 生产环境部署:要是要放到生产环境用,记得把
debug模式关掉,用Gunicorn当WSGI服务器,再配个Nginx做反向代理,这样更稳定。
八、总结
这篇文章从环境准备、架构设计、代码实现到功能测试,把用Python操作KingbaseES数据库,还有搭网页管理系统的过程都讲清楚了。咱们用Flask框架和psycopg2驱动,实现了数据增删改查的全流程,前端用原生HTML/CSS,页面简单又好用。
希望这篇文章能帮大家快速掌握用Python操作国产数据库的技巧,给国产化项目开发提供点参考。
以上就是Python操作国产金仓数据库KingbaseES全流程的详细内容,更多关于Python操作数据库KingbaseES的资料请关注编程客栈(www.devze.com)其它相关文章!


 加载中,请稍侯......
精彩评论