目录
- 效果图
- 实现思路
- 完整代码
效果图

好久没有写wpf了。
最近看到飞书的点赞动画非常有意思,决定试试,虽然不及飞书那样的绚丽,但是练手还是可以的,希望自己的手艺还在!
实现思路
那么如何写一个这样的动画呢?
首先需要刨析这个动画的构成:
- 外圈圆
- 大拇指-1竖着
- 大拇指-2握着
- 颤动动画
- 中心旋转动画
- 展开中心旋转动画
当我们分析这些东西剩下的就好办了。
首先我们先办了这个最难的东西大拇指。

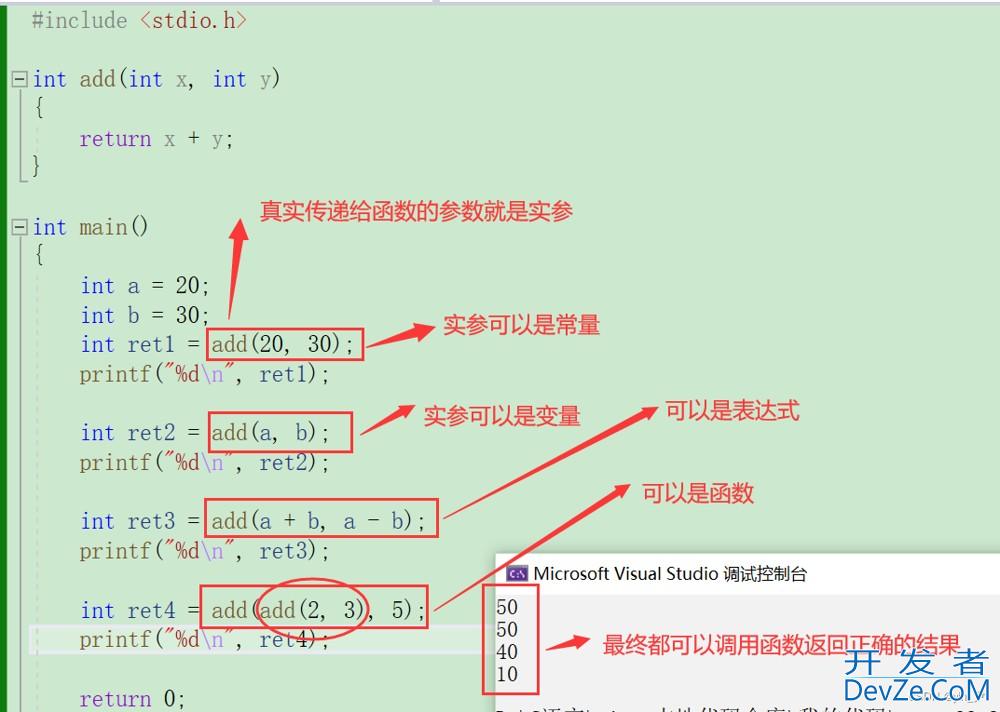
这个东西的构成,我们使用Path 直接去写。显然我们就会得到这样的代码
<Geometry  x:Key="t1">
            M 20 40
                v 0 40
                h 0 7
                v 0 -40
                z
                M 30 42
                v 0  38
                h 40 0
                l 15 -35
                l -10 www.devze.com-5
                h -25 0
                l 2 -20
            <!--小褶皱-->
            q -10 -10, -20 22
               z
  </Geometry>
当我们在path 100*100的大小的时候使用脑补进行绘制就就可以了。
至于这个小褶皱我曾经不想要,但是看到了自己的猪爪...还是决定加上了。
这代码的原理非常简单,基本都是基本的直线绘制,最难的就是用了个贝塞尔来制造大拇指背部的弧度.
不管咋样还是弄出来个简单的赞。
剩下就是握着的状态了
那么我们只需要修改部分代码就可以达到了~
也就是
<Geometry  x:Key="t2">
            M 20 40
                v 0 40
                h 0 7
                v 0 -40
                z
                M 30 42
                v 0  38
                h 40 0
                l 15 -35
                l -10 -5
                h -25 0
                l 2  0
            <!--小褶皱-->
            q -10 -10, -20 0
                z
        </Geometry>
我们修改了最后两行代码的 l 的y参数和q最后的end point参数的y的值都是降到0了 这样会形成一个简单的弧度

哈 这样子 我们就是得到了两个手掌的不同状态了。
剩下的事情就是来组装吧~~~~
首先是大拇指张开和大拇指握住的状态转换。
做到这事情最简单的动画就是使用eventtigger来做,我们使用简单的鼠标按下事件作为启动,当然了 想要丰富过程也是可以使用鼠标浮动事件作为启动事件之一。
<Path.Triggers>
                    <EventTrigger  RoutedEvent="MouseLeftButtonDown">
                        <BeginStoryboard x:Name="Bs1">
                            <Storyboard>
                                <ObjectAnimationUsingKeyFrames BeginTime="0:0:0" Storyboard.TargetProperty="Data">
                                    <DiscreteObjectKeyFrame KeyTime="0:0:0.01">
                                        <DiscreteObjectKeyFrame.Value>
                                            <StaticResource ResourceKey="t2"/>
                                        </DiscreteObjectKeyFrame.Value>
                                    </DiscreteObjectKeyFrame>
                                </ObjectAnimationUsingKeyFrames>
                 </Storyboard>
                        </BeginStoryboard>
             </EventTrigger>
                </Path.Triggers>
为了做件事 ,我们把geometry作为window的资源 所以子啊写动画的时候 用离弦值就非常方便了。
观察代码,我们仅仅只是在点下的时候让path转换为握住的data,因为我们需要在松开左键的时候才让拇指竖起来。
所以还需要补上一个MouseLeftButtonUp的动画
这最终的代码就是
<Path.Triggers>
                    <EventTrigger  RoutedEvent="MouseLeftButtonDown">
                        <BeginStoryboard x:Name="Bs1">
                            <Storyboard>
                                <ObjectAnimationUsingKeyFrames BeginTime="0:0:0" Storyboard.TargetProperty="Data">
                                    <DiscreteObjectKeyFrame KeyTime="0:0:0.01">
                                        <DiscreteObjectKeyFrame.Value>
                                            <StaticResource ResourceKey="t2"/>
                                        </DiscreteObjectKeyFrame.Value>
                                    </DiscreteObjectKeyFrame>
                                </ObjectAnimationUsingKeyFrames>
                 </Storyboard>
                        </BeginStoryboard>
             </EventTrigger>
             <EventTrigger RoutedEvent="MouseLeftButtonUp">
                        <RemoveStoryboard BeginStoryboardName="Bs1"/>
                    </EventTrigger>
                </Path.Triggers>
效果图

莫名的搞笑....
基础的东西我们构建好了,剩下就是补全了。
不全颤抖啊,补全中心旋转动画,也就是手指握住后有一个向下的动画。
首先这个颤动 我们可以简单的理解为位移,一个快速的上下左右的位移
正好WPF有这种动画 所以我们就可以得到如下的代码
<ThicknessAnimationUsingKeyFrames RepeatBehavior="Forever" Duration="0:0:0.4"  Storyboard.TargetProperty="Margin" >
                                    <SplineThicknessKeyFrame KeyTime="0:0:0.0" Value="4,3,0,0"/>
                                    <SplineThicknessKeyFrame KeyTime="0:0:0.2" Value="3,4,0,0"/>
                                    <SplineThicknessKeyFrame KeyTime="0:0:0.3" Value="0,0,4,0"/>
                                    <SplineThicknessKeyFrame KeyTime="0:0:0.35" Value="0,0,4,3"/>
                                    <SplineThicknessKeyFrame KeyTime="0:0:0.4" Value="4,3,0,0"/>
                                </ThicknessAnimationUsingKeyFrames>
我们可以直代码放到path的eventtriger中
看得出来 离散动画的值就是简单的marigin的位移,代码非常简单。

就是在这里颤抖...
虽然看上去不是很好看,但是我们结合下一个动画,也就是手掌向下就会好很多了
这个动画很明显是一个旋转动画,所以我们需要提前准备一个roteate的transofrom
android代码如下
<Path.RenderTransform>
                    <RotateTransform x:Name="rote" Angle="0"/>
  </Path.RenderTransform>
动画代码如下
<DoubleAnimation   Duration="0:0:0.1" To="30" Storyboard.TargetName="rote" Storyboard.TargetProperty="Angle">
                                    <DoubleAnimation.EasingFunction>
                                        <CubicEase/>
                                    </DoubleAnimation.EasingFunction>
       </DoubleAnimation>
我们简单的使用了一个函数,提升一下效果的动感...
但是感觉没啥用
效果图就是这样的了

虽然看上去已经非常不错了,但是还有些不做,想想 我们的手都朝下了 松开之后为啥没有一个向上的弹簧动作呢?

也就是我们需要在抬起时加上一个角度的旋转。
<EventTrigger RoutedEvent="MouseLeftButtonUp">
                        <BeginStoryboard x:Name="Bs2">
                            <Storyboard>
                                <DoubleAnimation  FillBehavior="Stop"  Duration="0:0:0.5" To="-30" Storyboard.TargetName="rote" Storyboard.TargetProperty="Angle">
                                    <DoubleAnimation.EasingFunction>
                                        <CubicEase EasingMode="Easeout"/>
                                    </DoubleAnimation.EasingFunction>
                                </DoubleAnimation>
                            </Storyboard>
                        </BeginStoryboard>
                        <RemoveStoryboard BeginStoryboardName="Bs1"/>
                    </EventTrigger>
代码可以说手掌向下的反向操作。
顺便播放完把bs1动画解除掉。
剩下的就是圈的构造和动画。
圆圈呢,我们可以是直接的圆圈,也可以是broder,看个人喜欢了。
我就不罗嗦直接上代码
<Border  BorderThickness="2" Background="Transparent" BorderBrush="Transparent"   CornerRadius="100" Width="200" Height="{Binding  RelativeSource={RelativeSource Mode=Self}, Path=Width}" Grid.Column="1" Grid.Row="1">
            <Border x:Name="sor" Visibility="Hidden" BorderThickness="2" Background="Transparent" BorderBrush="Transparent"   CornerRadius="100" Width="200" Height="{Binding  RelativeSource={RelativeSource Mode=Self}, Path=Width}" Grid.Column="1" Grid.Row="1"/>
        </Border>
构造了两个嵌套的borderr,宽度其实可以随意,只是演示的时候放大的大小而已。
动画则是放到了path的启动动画之中
也就是
<DoubleAnimation RepeatBehavior="Forever" SpeedRatio="1.2" Duration="0:0:1.5" To="0" Storyboard.TargetName="sor" Storyboard.TargetProperty="Width">
                                    <DoubleAnimation.EasingFunction>
                                        <CubicEase/>
                                    </DoubleAnimation.EasingFunction>
                                </DoubleAnimation>
                                <ObjectAnimationUsingKeyFrames BeginTime="0:0:0" Storyboard.TargetName="sor" Storyboard.TargetProperty="Visibility">
                                    <DiscreteObjectKeyFrame KeyTime="0:0:0.1">
                                        <DiscreteObjectKeyFrame.Value>
                                            <Visibility>
                                                Visible
                            php                </Visibility>
                                        </DiscreteObjectKeyFrame.Value>
                                    </DiscreteObjectKeyFrame>
                                </ObjectAnimationUsingKeyFrames>
代码非常简单,控制下内圈的大小,还有是否隐藏而已。
这样子我们就最终得到了头图的效果了

总的过程还是比较简单的。
完整代码
下面是全部的代码
<Window.Resources>
        <Geometry  x:Key="t1">
            M 20 40
                v 0 40
                h 0 7
                v 0 -40
                z
                M 30 42
                v 0  38
                h 40 0
                l 15 -35
                l -10 -5
                h -25 0
                l 2 -20
            <!--小褶皱-->
       android     q -10 -10, -20 22
                z
        </Geometry>
       android <Geometry  x:Key="t2">
            M 20 40
                v 0 40
                h 0 7
                v 0 -40
                z
                M 30 42
                v 0  38
                h 40 0
                l 15 -35
                l -10 -5
                h -25 0
                l 2  0
            <!--小褶皱-->
            q -10 -10, -20 0
                z
        </Geometry>
        <PathGeometry  Figures="   M 20 40 l 2 -5 v 0 5 h -2 0  z" x:Key="roue"/>
    </Window.Resources>
    <Grid>
        <Border  BorderThickness="2" Background="Transparent" BorderBrush="BlueViolet"   CornerRadius="100" Width="200" Height="{Binding  RelativeSource={RelativeSource Mode=Self}, Path=Width}" Grid.Column="1" Grid.Row="1">
            <Border x:Name="sor" Visibility="Hidden" BorderThickness="2" Background="Transparent" BorderBrush="Salmon"   CornerRadius="100" Width="200" Height="{Binding  RelativeSource={RelativeSource Mode=Self}, Path=Width}" Grid.Column="1" Grid.Row="1"/>
        </Border>
        <Grid Width="300" Height="300"   ShowGridLines="False">
            <Grid.RowDefinitions>
                <RowDefinition/>
                <RowDefinition />
                <RowDefinition/>
            </Grid.RowDefinitions>
            <Grid.ColumnDefinitions>
                <ColumnDefinition/>
                <ColumnDefinition/>
                <ColumnDefinition/>
            </Grid.ColumnDefinitions>
            <Path StrokeThickness="2"   Grid.Column="1" Grid.Row="1" VerticalAlignment="Bottom" Stretch="Uniform" Fill="Pink" Width="80" Height="80" Stroke="Blue" Data="{StaticResource t1}" RenderTransformOrigin="0.5,0.5">
                <Path.RenderTransform>
                    <RotateTransform x:Name="rote" Angle="0"/>
                </Path.RenderTransform>
                <Path.Triggers>
                    <EventTrigger  RoutedEvent="MouseLeftButtonDown">
                        <BeginStoryboard x:Name="Bs1">
                            <Storyboard>
                                <ObjectAnimationUsingKeyFrames BeginTime="0:0:0" Storyboard.TargetProperty="Data">
                                    <DiscreteObjectKeyFrame KeyTime="0:0:0.01">
                                        <DiscreteObjectKeyFrame.Value>
    开发者_JAVA教程                                        <StaticResource ResourceKey="t2"/>
                                        </DiscreteObjectKeyFrame.Value>
                                    </DiscreteObjectKeyFrame>
                                </ObjectAnimationUsingKeyFrames>
                                <ThicknessAnimationUsingKeyFrames RepeatBehavior="Forever" Duration="0:0:0.4"  Storyboard.TargetProperty="Margin" >
                                    <SplineThicknessKeyFrame KeyTime="0:0:0.0" Value="4,3,0,0"/>
                                    <SplineThicknessKeyFrame KeyTime="0:0:0.2" Value="3,4,0,0"/>
                                    <SplineThicknessKeyFrame KeyTime="0:0:0.3" Value="0,0,4,0"/>
                                    <SplineThicknessKeyFrame KeyTime="0:0:0.35" Value="0,0,4,3"/>
                                    <SplineThicknessKeyFrame KeyTime="0:0:0.4" Value="4,3,0,0"/>
                                </ThicknessAnimationUsingKeyFrames>
                                <DoubleAnimation   Duration="0:0:0.1" To="30" Storyboard.TargetName="rote" Storyboard.TargetProperty="Angle">
                                    <DoubleAnimation.EasingFunction>
                                        <CubicEase/>
                                    </DoubleAnimation.EasingFunction>
                                </DoubleAnimation>
                                <DoubleAnimation RepeatBehavior="Forever" SpeedRatio="1.2" Duration="0:0:1.5" To="0" Storyboard.TargetName="sor" Storyboard.TargetProperty="Width">
                                    <DoubleAnimation.EasingFunction>
                                        <CubicEase/>
                                    </DoubleAnimation.EasingFunction>
                                </DoubleAnimation>
                                <ObjectAnimationUsingKeyFrames BeginTime="0:0:0" Storyboard.TargetName="sor" Storyboard.TargetProperty="Visibility">
                                    <DiscreteObjectKeyFrame KeyTime="0:0:0.1">
                                        <DiscreteObjectKeyFrame.Value>
                                            <Visibility>
                                                Visible
                                            </Visibility>
                                        </DiscreteObjectKeyFrame.Value>
                                    </DiscreteObjectKeyFrame>
                                </ObjectAnimationUsingKeyFrames>
                            </Storyboard>
                        </BeginStoryboard>
                    </EventTrigger>
                    <EventTrigger RoutedEvent="MouseLeftButtonUp">
                        <BeginStoryboard x:Name="Bs2">
                            <Storyboard>
                                <DoubleAnimation  FillBehavior="Stop"  Duration="0:0:0.5" To="-30" Storyboard.TargetName="rote" Storyboard.TargetProperty="Angle">
                                    <DoubleAnimation.EasingFunction>
                                        <CubicEase EasingMode="EaseOut"/>
                                    </DoubleAnimation.EasingFunction>
                                </DoubleAnimation>
                            </Storyboard>
                        </BeginStoryboard>
                        <RemoveStoryboard BeginStoryboardName="Bs1"/>
                    </EventTrigger>
                </Path.Triggers>
            </Path>
        </Grid>
以上就是基于WPF绘制一个点赞大拇指动画的详细内容,更多关于WPF绘制点赞动画的资料请关注我们其它相关文章!

 加载中,请稍侯......
精彩评论